Navio
Navio is a d3 visualization widget to help summarizing, exploring and navigating large datasets. It supports three main interactions, click on a header to sort the data, click on a value to select it, or drag to select a range.
Try it on Observable:
You can explore your own data very easily on ObervableHQ. Just fork this base Navio notebook, change your data and attributes.
Use it with Shipyard:
If you have data and just want a quick way of summarize it, explore it or filter it, you can try Shipyard, our stand-alone application for Navio. (You can also export template code to use it)

Demos:
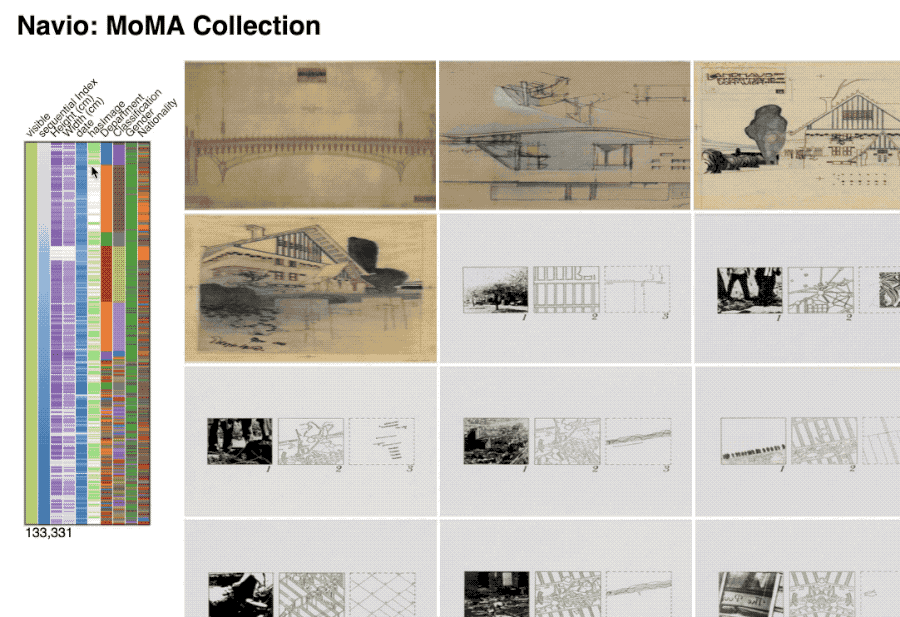
- MoMa Collection (Code)
- Navio-only Vast 2017 MiniChallenge1 (Code)
- Co-voting patterns of the Colombian senate
- Simplest example with Networks on SVG (Code)
- Simple example with Networks on Canvas (Code)
Install
npm install navioOr use it from unpkg
  <script type="text/javascript" src="https://d3js.org/d3.v4.min.js"></script>
  <script src="https://d3js.org/d3-scale-chromatic.v1.min.js"></script>
  <script type="text/javascript" src="https://unpkg.com/navio/dist/navio.min.js"></script>
Requires d3 v4 or higher and d3-scale-chromatic.
Usage
TLDR
<!DOCTYPE html>
<body>
  <!-- Placeholder for the widget -->
  <div id="navio"></div>


  <!-- NAVIO Step 0: Load the libraries -->
  <script type="text/javascript" src="https://d3js.org/d3.v4.min.js"></script>
  <script src="https://d3js.org/d3-scale-chromatic.v1.min.js"></script>
  <script type="text/javascript" src="https://unpkg.com/navio/dist/navio.min.js"></script>
<script>

<script>
  // NAVIO  Step 1.  Create a Navio passing a d3 selection to place it and an optional height
  var nv = navio(d3.select("#navio"), 600);

  // NAVIO Step 2. Add the Categorical and Sequential attributes you want to use
  var catColumns = [ YOUR_CATEGORICAL_ATTRIBUTE_NAMES_HERE ];
  var seqColumns = [ YOUR_SEQUENTIAL_ATTRIBUTE_NAMES_HERE ];
  catColumns.forEach((c) => nv.addCategoricalAttrib(c));
  seqColumns.forEach((c) => nv.addSequentialAttrib(c));

  // NAVIO Step 3. Load your data!
  d3.csv(YOUR_DATA, function (err, data) {
    if (err) throw err;

    nv.data(data);
  });
</script>
</body>
</html>
Step by step
- Start with this template
<!DOCTYPE html>
<html lang="en">
<head>
  <meta charset="UTF-8">
  <meta name="viewport" content="width=device-width, initial-scale=1.0">
  <meta http-equiv="X-UA-Compatible" content="ie=edge">
  <title>Basic Usage</title>
</head>
<body>

  // Your Navio widget goes here
  <div id="Navio"></div>

</body>
</html>
- Create and import a new JavaScript file below the scripts (d3 and Navio) or right in the html like in the example below.
<script src="https://d3js.org/d3.v4.min.js"></script>
<script type="text/javascript" src="https://john-guerra.github.io/navio/Navio.js"></script>
<script type="text/javascript">
  //   YOUR_JS_CODE_HERE
</script>- Create an array with the columns that are categorical and another for the sequential.
var catColumns = [
  "car-type",
  "gate-name",
  "dayOfTheWeek"
];
var seqColumns = [
  "minutes",
  "hours",
  "day",
  "month"
];- Set the Navio and its attributes
var nv = navio(d3.select("#Navio"), 600);
catColumns.forEach((c) => nv.addCategoricalAttrib(c));
seqColumns.forEach((c) => nv.addSequentialAttrib(c));

// You can also pass custom Attributes
var color = d3.scaleOrdinal(d3.schemeSet3)
nv.addAttrib("cluster", color);
- Read CSV dataset and set the data
d3.csv("./dataset.csv", function (err, data) {
  if (err) throw err;
  nv.data(data);
});
License
Navio.js is licensed under the MIT license. (http://opensource.org/licenses/MIT)